UP TO 18% AUTUMN DISCOUNT! TAKE ADVANTAGE NOW! International delivery to EU member countries!

 EN/
 Romana
Fence Mix Recipe
REQUIRED MATERIALS
1. FRAME - FENCE PANEL MOLD SUPPORT
- 1 piece of 50x30x2 mm rectangular steel tube, 6 m long;
- 1 piece of 15x15x1.5 mm rectangular steel tube, 6 m long;
- 1 sheet of 8 mm OSB, 2500x1250 mm;
2. POST MOLD SUPPORT
- 1 wooden board matching the length of the post mold, 13x2 cm;
- 2 wooden boards matching the length of the post mold, 15x2 cm;
- 2 wooden boards, 17x15 cm, for the support end caps;
- 2 wooden boards for the support handles (approx. 19 cm long);
3. CONCRETE (quantity for one mold)
- sodium silicate (water glass);
- 8 liters of water;
- 2 buckets (10-liter capacity) of 4-8 mm decorative marble aggregate;
- 1 bucket (10-liter capacity) of cement (Holcim 52.5 standard compressive strength [MPa]);
- 1 bucket (10-liter capacity) of sand;
4. REINFORCEMENT
- 3 pieces of 8 mm ribbed steel bars matching the length of the fence panel mold;
- 4 pieces of 8 mm ribbed steel bars matching the length of the post mold;
5. CLEANING
- Water;
- White vinegar;
BUILDING THE SUPPORTS
1. FRAME - FENCE PANEL MOLD SUPPORT
- Cut the 50x30 mm rectangular steel tube in half (3 meters each), then cut 50 cm from each 3 m section. You should obtain 2 pieces of 2.5 m and 2 pieces of 50 cm;
- Cut the 15x15 mm rectangular steel tube into pieces approximately 60 cm long;
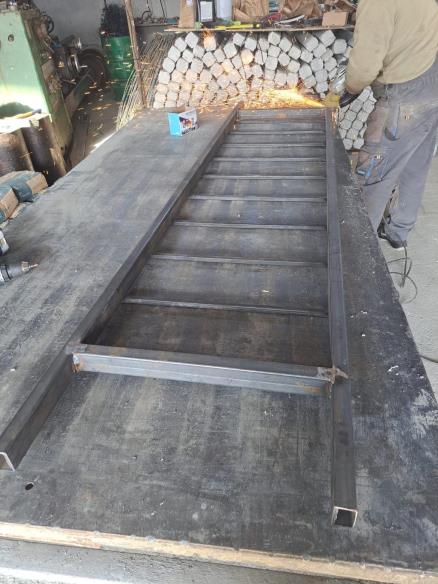
- Weld the steel tubes together as shown in the image (the inside dimensions of the frame must match the size of the fence panel, for example 200x50 cm):
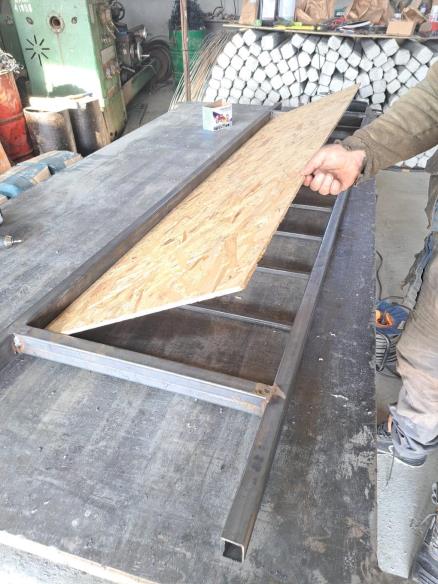
- Cut the OSB sheet and place it inside the frame:
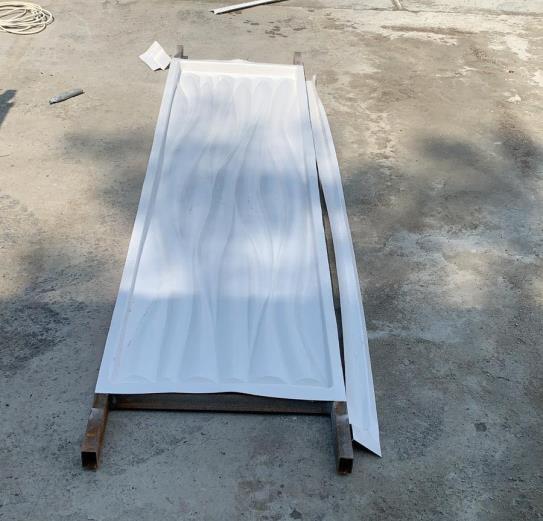
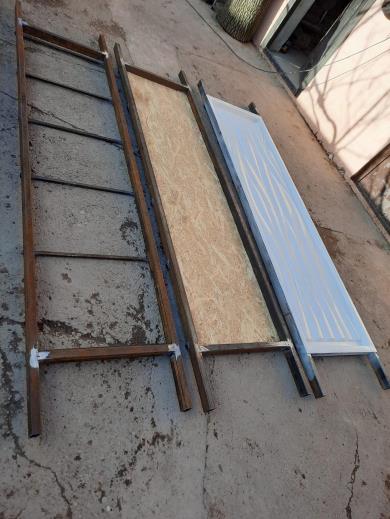
- Trim the edges of the mold using an angle grinder and place it into the frame:
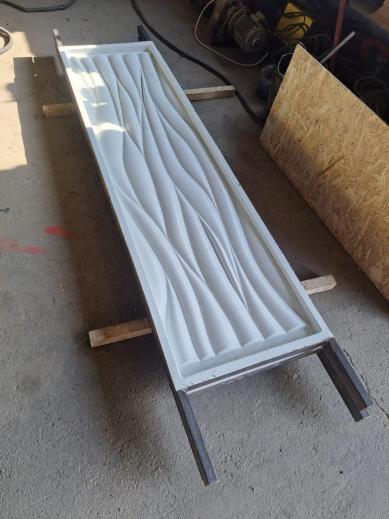
2. POST MOLD SUPPORT
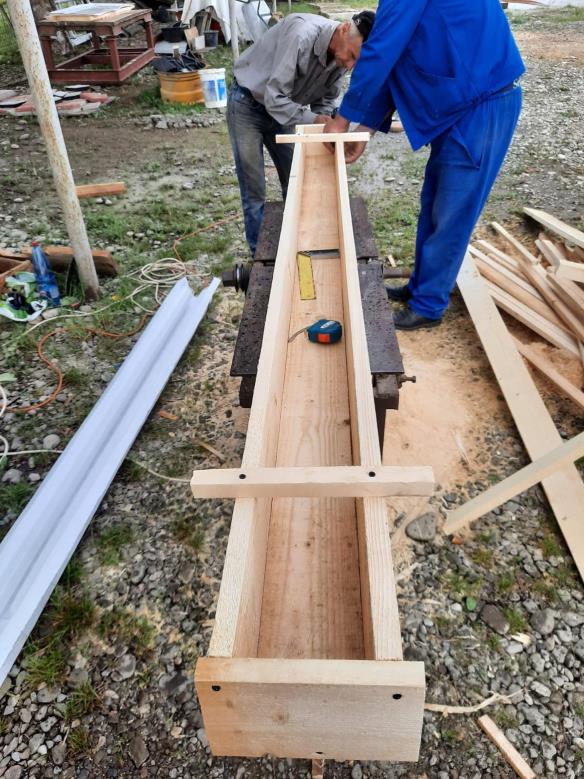
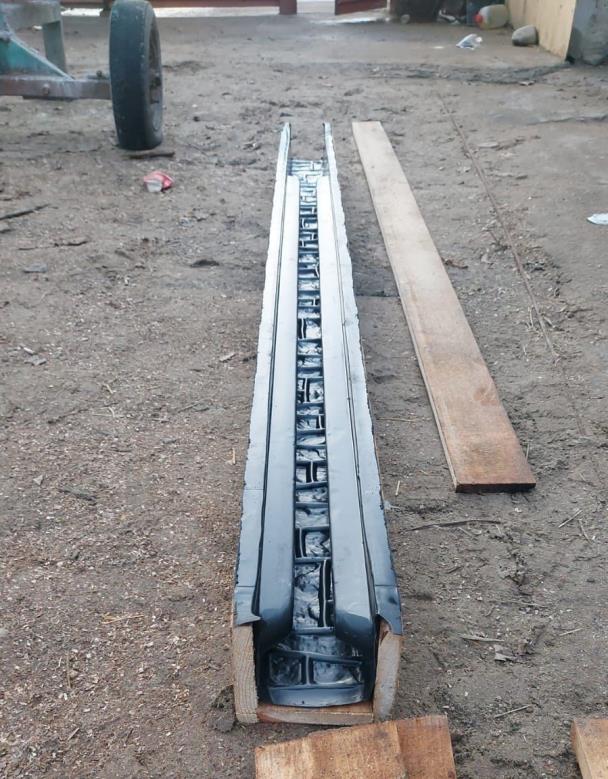
- Fasten the wooden boards together using wood screws (the 13 cm wide board forms the base, the two 15 cm wide boards form the sides, followed by the two end caps and the two handles), as shown in the image:
WORKING INSTRUCTIONS
- Rinse the mold with clean water;
- Mix 80 liters of water with 1 liter of sodium silicate in a plastic container. Warning! Do not wash yourself with this water!
- Add 8 liters of the prepared water, 2 buckets of decorative marble aggregate, 1 bucket of cement, and 1 bucket of sand into the concrete mixer and mix thoroughly;
- With the mold placed in its support, use a 5-liter bucket to pour the concrete into different areas until the mold is half full;
- Shake the mold gently to distribute the material evenly, then place the 3 reinforcing steel bars along its length, equally spaced.
- Fill the mold with the remaining material until it is completely full, then shake it until the surface is level.
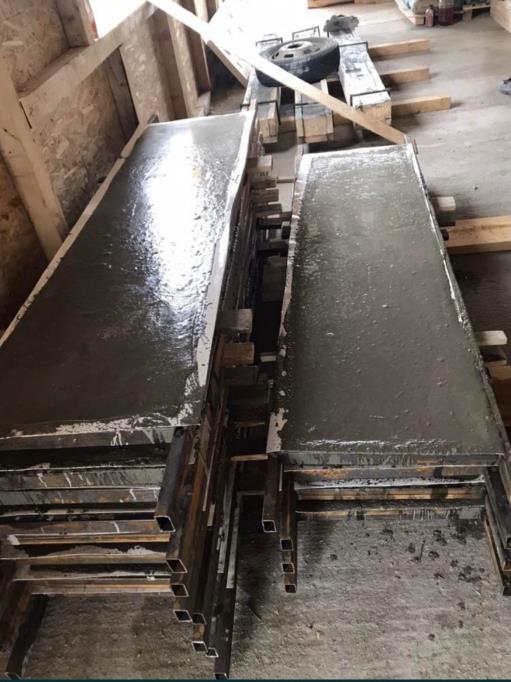
- Follow the same procedure for the post mold: fill it halfway with concrete, place 2 reinforcing bars along the sides, fill the mold completely, then add the remaining 2 reinforcing bars. Shake the support thoroughly to level the material and remove trapped air bubbles.
- Cover the molds with plastic foil. This keeps the moisture inside the molds and prevents the concrete from cracking.
- Allow them to dry completely for 24/48/72 hours depending on the outside temperature: 24 hours in summer, 48 hours in spring/autumn, and 72 hours in winter (indoors if the room is unheated).
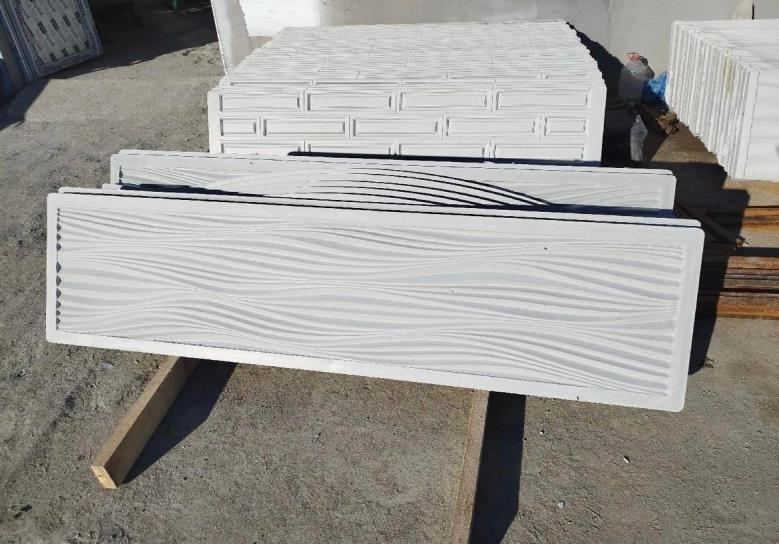
- Once fully cured, to demold the fence panel, place 3-4 wooden boards on the ground, bring the frame next to them, and carefully turn the panel onto the boards. Then gently lift away the frame and the mold.
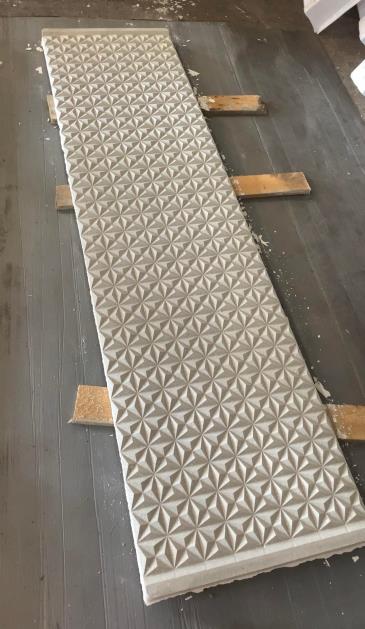
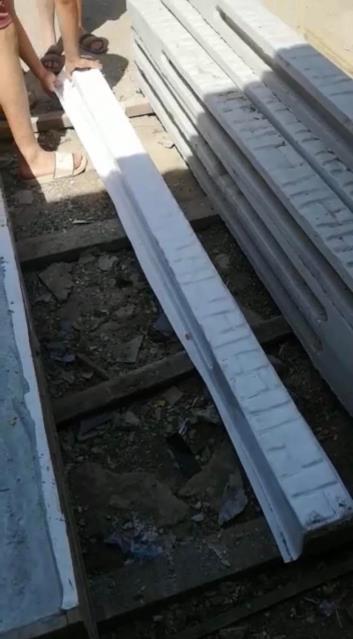
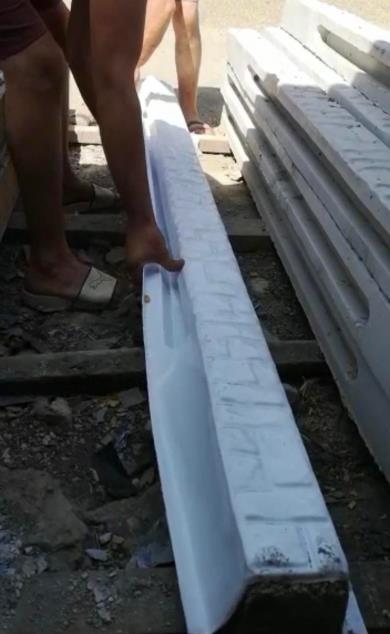
- To demold the post, place wooden boards on the ground as for the fence panels, position the post on the boards, remove the support end caps and handles, then turn the support upside down and lift it away.
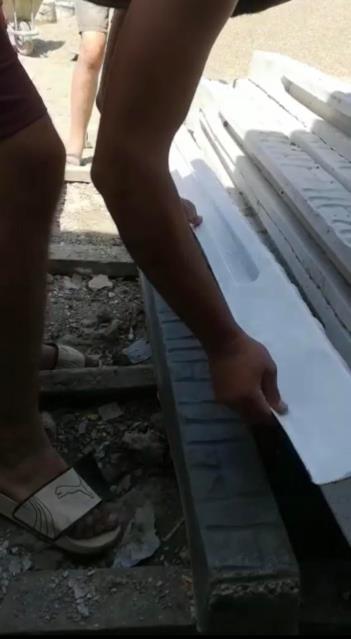
- To remove the mold, carefully loosen one edge along the entire length of the post. Once loosened, pull the mold gently towards you and lift it upward from the side.
- Store the fence panels stacked one on top of another.
CLEANING
Fill the molds with water and white vinegar, then use a soft sponge to remove all residue.
INSTALLATION
Step 1 – Take measurements
Mark the area where the fence will be installed using string and stakes. With marking spray or powdered chalk, mark the locations where the post holes will be dug.
Step 2 – Level the ground
To avoid gaps beneath the fence, level the ground. This can be done by smoothing the terrain or adding soil where necessary to fill holes or uneven areas.
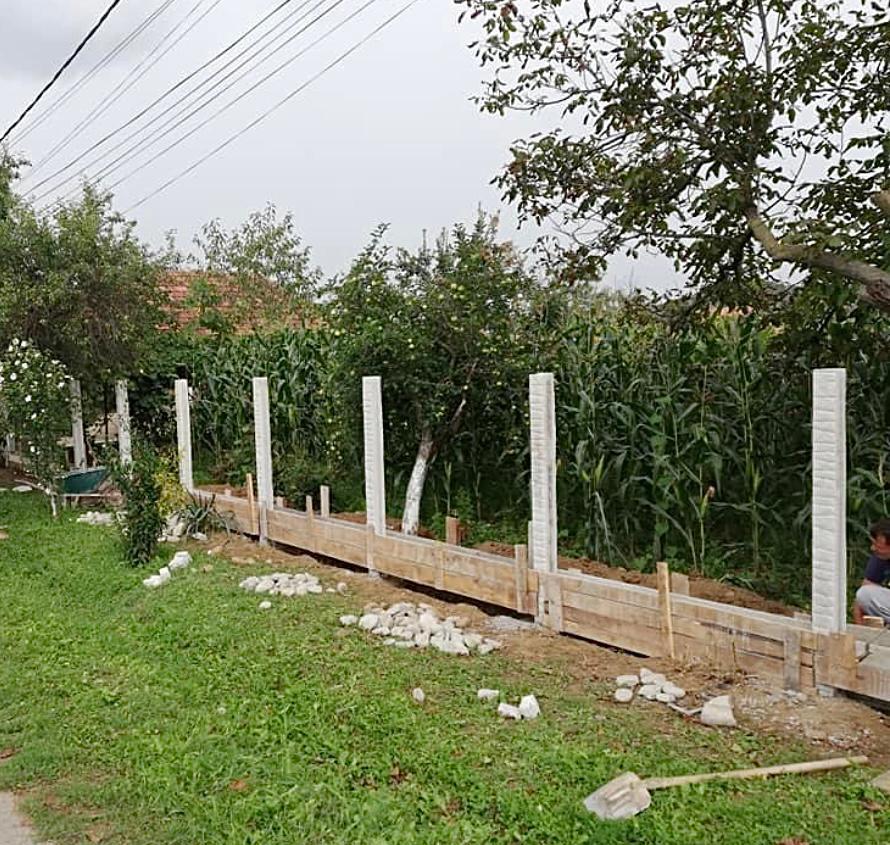
Step 3 – Install the posts
After marking and digging the holes, install the support posts at equal distances and to the desired height. Then pour the concrete, either mixed manually or delivered by concrete truck, and level it using a screed or trowel.
Install the wooden formwork after marking the foundation line. Make sure the dimensions remain consistent along the entire length of the fence.
Drying times vary depending on the type of cement used. Follow the manufacturer's recommendations regarding curing and watering the foundation after pouring to prevent cracking and ensure maximum durability.
Once the concrete has fully cured, remove the formwork and continue building the fence.
Step 4 – Install the fence panels
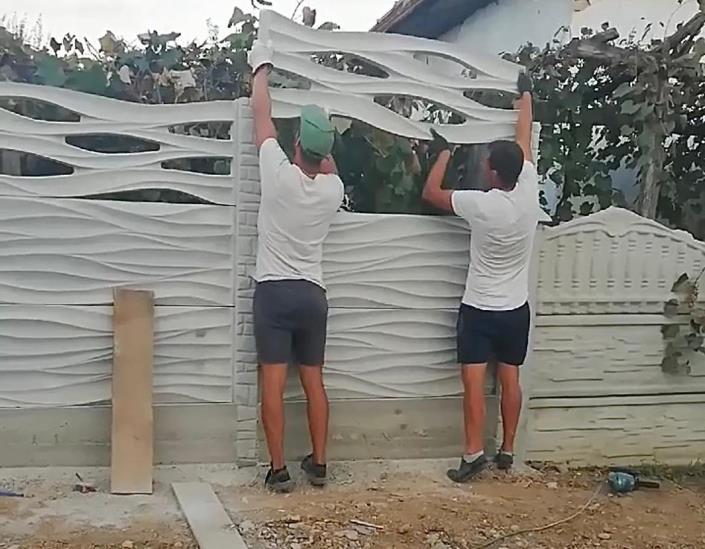
Now it's time to install the fence panels. Insert the panels from top to bottom, one by one, until the section is complete. One fence section can consist of 3 or 4 panels, depending on the desired fence height.
1. FRAME - FENCE PANEL MOLD SUPPORT
- 1 piece of 50x30x2 mm rectangular steel tube, 6 m long;
- 1 piece of 15x15x1.5 mm rectangular steel tube, 6 m long;
- 1 sheet of 8 mm OSB, 2500x1250 mm;
2. POST MOLD SUPPORT
- 1 wooden board matching the length of the post mold, 13x2 cm;
- 2 wooden boards matching the length of the post mold, 15x2 cm;
- 2 wooden boards, 17x15 cm, for the support end caps;
- 2 wooden boards for the support handles (approx. 19 cm long);
3. CONCRETE (quantity for one mold)
- sodium silicate (water glass);
- 8 liters of water;
- 2 buckets (10-liter capacity) of 4-8 mm decorative marble aggregate;
- 1 bucket (10-liter capacity) of cement (Holcim 52.5 standard compressive strength [MPa]);
- 1 bucket (10-liter capacity) of sand;
4. REINFORCEMENT
- 3 pieces of 8 mm ribbed steel bars matching the length of the fence panel mold;
- 4 pieces of 8 mm ribbed steel bars matching the length of the post mold;
5. CLEANING
- Water;
- White vinegar;
BUILDING THE SUPPORTS
1. FRAME - FENCE PANEL MOLD SUPPORT
- Cut the 50x30 mm rectangular steel tube in half (3 meters each), then cut 50 cm from each 3 m section. You should obtain 2 pieces of 2.5 m and 2 pieces of 50 cm;
- Cut the 15x15 mm rectangular steel tube into pieces approximately 60 cm long;
- Weld the steel tubes together as shown in the image (the inside dimensions of the frame must match the size of the fence panel, for example 200x50 cm):
- Cut the OSB sheet and place it inside the frame:
- Trim the edges of the mold using an angle grinder and place it into the frame:
2. POST MOLD SUPPORT
- Fasten the wooden boards together using wood screws (the 13 cm wide board forms the base, the two 15 cm wide boards form the sides, followed by the two end caps and the two handles), as shown in the image:
WORKING INSTRUCTIONS
- Rinse the mold with clean water;
- Mix 80 liters of water with 1 liter of sodium silicate in a plastic container. Warning! Do not wash yourself with this water!
- Add 8 liters of the prepared water, 2 buckets of decorative marble aggregate, 1 bucket of cement, and 1 bucket of sand into the concrete mixer and mix thoroughly;
- With the mold placed in its support, use a 5-liter bucket to pour the concrete into different areas until the mold is half full;
- Shake the mold gently to distribute the material evenly, then place the 3 reinforcing steel bars along its length, equally spaced.
- Fill the mold with the remaining material until it is completely full, then shake it until the surface is level.
- Follow the same procedure for the post mold: fill it halfway with concrete, place 2 reinforcing bars along the sides, fill the mold completely, then add the remaining 2 reinforcing bars. Shake the support thoroughly to level the material and remove trapped air bubbles.
- Cover the molds with plastic foil. This keeps the moisture inside the molds and prevents the concrete from cracking.
- Allow them to dry completely for 24/48/72 hours depending on the outside temperature: 24 hours in summer, 48 hours in spring/autumn, and 72 hours in winter (indoors if the room is unheated).
- Once fully cured, to demold the fence panel, place 3-4 wooden boards on the ground, bring the frame next to them, and carefully turn the panel onto the boards. Then gently lift away the frame and the mold.
- To demold the post, place wooden boards on the ground as for the fence panels, position the post on the boards, remove the support end caps and handles, then turn the support upside down and lift it away.
- To remove the mold, carefully loosen one edge along the entire length of the post. Once loosened, pull the mold gently towards you and lift it upward from the side.
- Store the fence panels stacked one on top of another.
CLEANING
Fill the molds with water and white vinegar, then use a soft sponge to remove all residue.
INSTALLATION
Step 1 – Take measurements
Mark the area where the fence will be installed using string and stakes. With marking spray or powdered chalk, mark the locations where the post holes will be dug.
Step 2 – Level the ground
To avoid gaps beneath the fence, level the ground. This can be done by smoothing the terrain or adding soil where necessary to fill holes or uneven areas.
Step 3 – Install the posts
After marking and digging the holes, install the support posts at equal distances and to the desired height. Then pour the concrete, either mixed manually or delivered by concrete truck, and level it using a screed or trowel.
Install the wooden formwork after marking the foundation line. Make sure the dimensions remain consistent along the entire length of the fence.
Drying times vary depending on the type of cement used. Follow the manufacturer's recommendations regarding curing and watering the foundation after pouring to prevent cracking and ensure maximum durability.
Once the concrete has fully cured, remove the formwork and continue building the fence.
Step 4 – Install the fence panels
Now it's time to install the fence panels. Insert the panels from top to bottom, one by one, until the section is complete. One fence section can consist of 3 or 4 panels, depending on the desired fence height.